1. Introduction:
These days, most firearm enthusiasts use some kind of optical sighting device on most of their guns. Not just rifles, but shotguns and handguns as well.
There’s a great reason for this. Simplicity. Aiming through a scope or a red dot sight completely eliminates one third of the complexity of lining up iron sights. With metallic sights you are required to line up the rear sight with the front sight and your target. With a scope, you simply have to line up your crosshairs (reticle) with your target. It’s much easier to learn to shoot with a scope than iron sights, and since most rifle scopes also magnify, your target appears closer, and therefore easier to see, enabling you to place a more precise shot on your target. People with less than perfect vision are able to adjust the eyepiece (ocular) focus for their particular eyes for a clear, crisp sight picture. Older eyes often have a difficult, if not impossible time trying to switch their focus from a rear sight to a front sight to a target as required without a scope, and it’s frustrating to say the least. Scopes eliminate this frustration.
2. The Right Tool for the Job
You don’t use a seven ounce claw hammer to pound in sixteen penny nails, or a baby sledge hammer for finishing nails.
Magnumitis sinks its ugly claws into greater numbers of hunters every year. Cartridges and scopes get more powerful annually, and uninformed nimrods often use these combinations for whitetail deer where almost all shots are well under a hundred yards. Bullets go faster and optics magnify more because they sell. Manufacturers will make anything they think enough people want. Pink scopes? Start a petition. Square main tubes? Have enough people phone. This is fine. Some people might call this progress. But use the right tool for the job.
The average deer rifle used to wear a 3-9 scope, and for good reason. Three power is low enough, with enough light transmission and field of view for close shots in most applications, and nine power gives you plenty of magnification for longer shots. A major percentage of people now want to choose scopes for whitetail deer with top magnifications of fourteen, or twenty, or even more. This is, more often than not, a mistake. Less is more.
Not only does higher magnification subtract from your available light, the low end of a high magnification scope is much too high to take a very close shot. Your scope on a whitetail rifle should almost always be kept at its lowest power. If that power happens to be five or six, many times your deer, only yards away, appears as a hairy patch through your scope, or your field of view is so narrow you can’t find him, or it’s so dark you can’t make him out.
The first question a Navy aircraft carrier pilot asks about a new jet aircraft is not how fast it goes, but how slow it goes. They have to land on a tiny moving piece of flight deck bobbing around on an immense ocean. Slow is more important than fast in most cases.
Just as those bold Navy pilots, it’s prudent to know how low a scope goes, not how high. Low is more important in most cases. You can always shoot far with low power, or have time to turn your scope up, but you can’t shoot close with high power because your field of view (FOV) is too small and light transmission is poor.
I might be getting ahead of some folks with my descriptions. The following diagram might help a bit.
In a 3-9X40 scope, the 3 means three power, or 3X. This means that the image you see through the scope appears three times (3X) closer than it does with your naked eye. The 9 means nine power, or nine times (9X) closer than it appears with your naked eye. The forty (40) is the objective lens diameter in millimeters. This is a variable scope because you can vary the magnification of the scope from three to nine, stopping anywhere in between. You would describe this scope as a “three to nine by forty.”
Most scopes, especially in America have main tubes that are one inch in diameter. That means that they use one inch rings. Some scopes have thirty millimeter main tubes. Those scopes will use thirty millimeter rings. There are several main types of bases that are used to connect the rings to your firearm. You need to know what kind of base you have to find out the exact type and height of the one inch or thirty millimeter rings you will use for your specific scope.
3. Light Transmission and Eye Relief
Scopes don’t gather light, as most people think, although the term “light gathering ability” has become accepted jargon. Scopes transmit available light through the lenses to your eye, always losing a bit in the process. The best a scope can hope to offer in light transmission is about a theoretical 98%, which only the very finest (read expensive) scopes can hope to approach. Anything above 95% is considered great, and most scopes are around 90%, give or take a bit.
The more magnification you have, the less light you get to your eyepiece. The larger the objective lens, the more you get through your eyepiece.
Aged eyes may dilate to only about four millimeters. Younger eyes may open up to seven millimeters and even more.
The small circle of light that appears in the eyepiece when you hold a scope at arms length is called an exit pupil. Here’s an interesting experiment to help explain it. Take a variable scope, put it at its lowest power, and hold it at arms length. See the circle of light in the ocular lens? That is the exit pupil. The diameter of it in millimeters is the exit pupil size. Now turn the scope up to its highest power and try it again. See how much smaller it gets? Imagine if you are using this scope during poor lighting conditions as common in hunting situations, like dawn or dusk. How small and dark will that exit pupil be? How well do you think you’ll be able to see through that tiny circle of light?
A formula for exit pupil is as follows: Divide the objective lens size in millimeters by the magnification. Example: if your 3-9X40 scope is set at 3X, 40 divided by 3 equals 13.3 millimeters, which is large enough for almost all low light applications. If your scope is set at 9X, 40 divided by 9 equals 4.44millimeters. The difference in available light from the larger exit pupil is significant.
The larger the exit pupil, the less critical the position of your head in relation to the scope is, also. The distance that your eye must be to the ocular lens to get a full, clear picture is called eye relief. Lower powered scopes will have a larger range of distance available for a full view. Higher powered scopes are sometimes very critical in relation to the centering of your eye through the middle of the tube, and the distance your eye must be from the ocular lens. Sometimes there is only a half inch closer or further you may be to see the whole available view. The largest eye relief currently available is about five inches, and that is pretty rare. Four inches is still great, and most scopes are between three and three and a half inches. Higher recoiling guns including slug guns require lots of eye relief to prevent “scope eye” or the cut that some people get from the ocular lens of the scope coming back under recoil and cutting a semicircular gash above the shooter’s eye.
When mounting a scope, it should be at its highest power, and in a position that your head and neck are comfortable. Your head should be positioned on the stock in the position you will be shooting the most. For instance, if you sight in a gun while shooting off a bench rest, your head tends to sneak up on the stock a bit. If this gun is then used for snap shooting for deer in the woods, your eye relief might not be optimal, nor might your sight picture.
4. Choosing a Magnification Range
As we have already discussed, a scope in the 3-9 magnification range for a whitetail deer gun is pretty standard. In Western states for mule deer or antelope, a 4-12 or 4.5-14 is not too much, especially when your average shot is many times as long as it would be in the eastern whitetail woods. On the plains or in open country you can even leave your scope at a higher power. You can often see all around you, with little chance of an animal surprising you, which they seem to do occasionally, anyway. In some cases you might have to shoot from hilltop to hilltop, or mountain to mountain.
For prairie dogs or long range target shooting, a 6-20X or 8-25X variable scope does not have too much power. Keep in mind though, on hot days, mirage and heat waves can make a high power scope almost unusable.
Some people prefer fixed power scopes for their simplicity and fewer moving parts. On some rifles, People like nothing more than a fixed 4X. Squirrel rifles and many 22s are well equipped with this magnification. Some target shooters use fixed power scopes with high magnification such as 24, 36, or 40 power.
A 2X scope is the most common for a handgun in a magnified scope. The more magnification you have, the harder it is to find your sight picture and target, and the more critical and closer your eye relief becomes. Shooting a handgun with a scope requires lots of practice, especially with anything over 2X. Higher powered variable scopes are really for the experienced shooter and are used almost exclusively from a rested position.
Shotgun scopes and muzzle loaders often have low power scopes for short range deer hunting with slugs, and for turkey. Again, a fixed 2X is fairly standard, but the trend is for variable power 2-7 scopes or even 3-9 scopes. Parallax is often factory set at 50, 60, or 75 yards. Shotgun scopes generally have maximum available eye relief to prevent “scope eye.”
5. Parallax
Parallax is hard for most people to understand. One way to help explain it is to picture the following: Most riflescopes in a medium-high variable power range, say 10X or slightly higher, which often don’t have external parallax adjustments, are parallax corrected at either 100 or 150 yards. If you take one of these scopes that is set at 100 yards and put it in a vise on high power, with the crosshairs centered on a bullseye on a target at say, 25 yards, and move your head slightly off center to the left and right or up or down, you’ll see the crosshairs move off the bullseye, even though the scope has not moved. The scope’s “eye” is not focused at the proper distance. This will also happen if the target is set at a much further distance, say 300 yards.
Another way to look at it is like this: Put a small mark from a pencil on a table, and put an inch or so of water in a clear drinking glass. Hold the glass an inch over the mark and move it around slightly in different directions. Looking down into the glass, watch the dot move in directions other than where it should be.
External parallax adjustments, called adjustable objectives, are generally on scopes of more than 10 power, or on scopes that are used at close distances. Parallax adjustments are made at the objective lens with a rotating dial marked in incremental distances. Recently it has become popular to install parallax adjustment dials on the left side of the turret housing, which is much more convenient and user friendly. This will become even more common.
Airgun scopes sometimes have high power of 18 or more, even for 10 meter targets. A bad parallax setting will not only appear out of focus, but will wreak havoc on your group sizes, even though your shooting might be technically perfect.
Just because you get a clear sight picture doesn’t mean you are parallax free.
A customer asked me the other day if he could get a clear picture through a 2X handgun scope at the 12 foot distance he shoots his air pistol in his house. I went into our warehouse and checked out several different brands. The answer was yes, a clear picture, but by nodding my head even slightly, the crosshairs moved inches off my target. These scopes would be practically unusable at that distance.
If a person only looked directly through the center of their scopes the same every time, parallax would not be an issue, but only a robot could be that repeatable, not a human.
Remember, adjustable objectives are generally not needed for hunting scopes under 10 or even a bit more power. It’s just an unnecessary feature to get in your way, and another thing to think about. Keep it simple. The slightly different points of impact possible in hunting applications make the usefulness of this feature negligible.
Airgun scopes and higher power scopes almost always have adjustable objectives. Rimfire scopes are often set at 60 yards for parallax. Shotgun scopes often at 75 yards. Riflescopes mostly at 100 or 150 yards.
6. Objective Lens size and Tube Diameter
Let’s talk about objective lens sizes. 40 to 44mm is pretty standard on a medium variable rifle scope. It’s trendy these days to have large objective lenses of 50, 56, or even 75mm in some cases. In most cases, these are unwarranted, and the largest ones are laughable. Large objective lenses will only transmit more useable light than smaller ones if they are set at their highest power in the dimmest conditions. The detriment is comfort and ease of eye alignment. With a properly mounted scope, you should be able to close your eyes, shoulder your gun with a proper, repeatable stock weld (a stock weld is the firm but comfortable and repeatable position of your face on the gun stock), open your eyes, and look directly through the center of your scope every time. Large objective lenses prevent this from happening because of the ring height required to keep such a large lens off your gun barrel. Some scopes require such high mounting that only your chin touches the stock. These scopes are also heavier, clumsier, unwieldy, unbalanced to carry, slower and less comfortable to shoot. Some of these scopes weigh up to an unbelievable 3.5 pounds!
Leupold might have something going on with their new VX-L line of scopes that combine a large objective lens with a contoured bottom that doesn’t interfere with your gun barrel, and lets you mount up to a 56mm lens with low rings!
The larger 30mm main tubes on some tubes are most useful for allowing for a greater range of elevation adjustments, not greater light transmission. In fact, most 30mm scopes have the same size lenses that are in one inch tubes.
7. Lenses and Coatings
Most scopes are fogproof and waterproof. Most scopes have coated lenses. The coatings are expensive and vary in type, number, and quality. It is very possible to have a scope with single coated lenses to greatly outperform a scope with multicoated lenses. It all depends on the quality of the glass and the coatings. Good quality does not come cheap.
The following are accepted terms for coatings:
Coated: A single layer on at least one lens surface.
Fully Coated: A single layer on all air to glass surfaces.
Multicoated: Multiple layers on at least one lens surface.
Fully Multicoated: Multiple layers on all air to glass surfaces.
Coatings reduce glare, and loss of light due to reflection. More coatings normally lead to better light transmission and sharper contrast.
8. Field of View
Field of view (FOV) is measured in feet at 100 yards. This is the amount of view you see through your scope from right to left at that distance. As magnification is increased, FOV goes down. As magnification is decreased, FOV goes up. For instance, a typical 3X variable scope might have a FOV at 100 yards of a bit over 30 feet, and at 9X, the FOV would be around 14 feet. A larger objective lens diameter will not change these figures.
9. Red Dot Sights
Red dot sights are normally 1X. That is to say, they have no magnification. One power (1X) is what our unaided eyes see. These red dot sights offer maximum available light transmission and wide fields of view. They are considered the fastest sights for target acquisition on any firearm. There is also unlimited eye relief on red dot sights. You can mount them on rifles, shotguns, or even handguns. High grade red dot sights such as made by EOTech and Aimpoint are parallax free, brutally strong, and battery life can be up to 50,000 hours! This is not a misprint! Thousands of our soldiers have these sights mounted on their guns overseas, and rely on them to help them protect our great country! Inexpensive red dot sights, although often not waterproof or parallax free are favorites on competition handguns for speed shooting, and on shotguns for turkey and deer. Dot sizes differ from small to large, and some have different reticles available with the turn of a dial. They are generally not for precision shooting because the size of the dot often takes up a good deal of your target at longer ranges.
10. Anything Called Tactical
Another trend today is the sale of anything called “tactical.” Military semi automatic rifles in the hands of advertisement-gobbling civilians often have super-high magnifications on their scopes up to and even including a ridiculous 40 power scope with an absurd 75mm objective lens weighing in at several pounds.
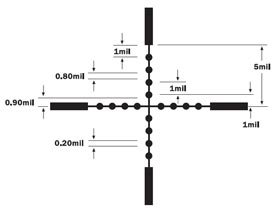
Real military snipers use top quality fixed 10X scopes most often. These have mildot reticles, that in the hands of a practiced individual or team of two, often with calculators, and knowing the approximate size of their target, can estimate distance and hold-over or elevation clicks. Almost all mildot calculations must be made with scopes at their highest power. Fixed power scopes eliminate miscalculations by having a scope set at less than its highest power.
The “mil” in mildot does not mean military. It means milliradian, a unit of measurement for angles.
Stateside law enforcement agencys most often use variable scopes of the highest quality, and mildot type reticles are not often used. They clutter the field of view, and the longest shots almost ever taken are across a street, well under 100 yards. Range estimation is not required.
Mildot reticles in most people’s scopes are nothing but a gimmick and an added expense. They will never use them the way they were designed, which is fine. You can still use them in the field to more accurately estimate hold-over at distances, especially for prairie dogs or plinking, or just because you want it. Buy what you like for any reason. You don’t have to buy or not buy something because of someone else’s opinion.
To get to know how mildots are used as intended, go to this excellent Leupold website and study.Mil-Dot Instruction Manual
11. Repeatability
Good quality scopes are repeatable. That is, if you adjust your windage and elevation dials for point of impact at one setting, then move them around and shoot in different places, often in a square grid, then back to the original place, the point of impact will be the same as it was when you started.
Good quality scopes will also move the point of impact when you adjust your dials, without having to “settle in.” That is to say, if you move your elevation dial up three inches, your point of impact should immediately reflect that. Sadly to say, more often than not, lesser quality scopes won’t do this without shooting a few times first, to “settle in” the scope’s internal adjustments. Some people “tap” on their scope with a coin or cartridge case to help this process.
12. Turret Adjustments and Minute of Angle (MOA)
Adjustments are made in “Minutes of Angle” (MOA). This is a unit of measurement of a circle, and is 1.0472 at 100 yards. For all practical purposes it is called 1 inch at 100 yards. It is 2 inches at 200 yards, 5 inches at 500 yards, one half inch at 50 yards, etcetera.
Scope adjustments are most often made in 1/4 inch increments at 100 yards. Each “click” of an elevation or windage turret will move your point of impact 1/4 inch at 100 yards. That same 1/4 inch click will move your point of impact 1/2 of an inch at 200 yards, or 1/8 inch at 50 yards. Some scopes have clicks that are 1/2 inch or even 1 inch. Some adjustment dials don’t have clicks at all, just a friction type adjustment that is infinitely adjustable.
If your bullet hole is four inches low at 100 yards and you have a scope with 1/4 minute clicks, you need to adjust your dial in the direction of the “up” arrow on your turret 16 clicks.
The turrets are housed in the center of your scope tube in a protrusion called the turret housing. The turrets are sometimes made to be turned with a coin, and sometimes they are finger adjustable. Target turrets are tall, and the clicks are easily seen and felt. Target turrets are most suited to use where they won’t get banged around or snagged on gear or brush. This is why hunting scopes don’t have them, and instead are much lower profile.
The turret caps are often sealed with an “O” ring, and help prevent moisture and debris entering the scope through its weakest parts.
13. Bullet Drop Compensators (BDCs)
Bullet drop compensators are turret adjustments matched to your caliber and bullet weight. Most bullet drop compensators are matched to common military calibers and weights such as 62 grain 5.56 (.223), and 168 grain 7.62 (.308). They work by having you estimate the range to your target, and by turning your turret to the corresponding distance marked on it. Ideally, your point of impact will be right on. BEWARE! THIS WILL NEVER HAPPEN! Most are substantially off. Even if a BDC was made for a particular load from a particular gun, it still wouldn’t be perfect because of other variables. Temperature, elevation, humidity, barrel cleanliness, lot number of ammo, etcetera. Minor changes make big differences. The further the distance, the further off you’ll be. Most BDCs for most guns are way off and can be used only to get you close.
14. Sighting In
If your scope is correctly mounted, using a boresighter should get you close enough to print a bullet hole on a large target at 50 yards. No boresighter, even a laser boresighter, will sight in your gun for you. You must shoot the gun and adjust your scope accordingly to sight it in. Every gun is an individual. No two are alike, even if the serial numbers are consecutive. If a particular gun shoots a certain kind of ammunition well, there’s absolutely no guarantee that an identical gun will like it at all.
If you mount a good scope on a good gun with good rings and bases, and find a certain kind of ammo that it shoots well, with a bullet that serves your purposes well, YOU WIN! Buy a case of the same exact ammo with the same lot number, keep it with the gun and don’t change a thing.
Also, your scope is at its strongest when your windage and elevation adjustments are in the center of the available adjustment range. When you buy a scope, turn the dials all the way one way and then the other, counting how many full and partial turns, then split that number and find the middle. Start there for your adjustments. Many rear bases have windage adjustments. Use them.
15. What to Spend
I would rather have a great scope than a great gun. Your gun will work when you pull the trigger, but if you can’t see where to place the bullet, the gun is useless. If you can’t rely on bullet placement, why even hunt or target shoot? I’ll never understand how people can take a week or more vacation, spend $1000.00 on a rifle, and sometimes thousands on a hunt, and buy a $150.00 scope mounted on $20.00 rings and bases. I know of many ruined hunts, and countless dollars lost, and guns wrapped around trees because of a faulty scope. I would rather spend $500.00 on a gun and $500.00 on a scope in good rings and bases, and lots of ammo and trigger time getting to intimately know my gun. During hunting situations, you often have enough to think about, including concealment, scent, and often at high elevations, just breathing. You shouldn’t have to think about having to work your gun.
Spend as much as you can afford on your new rifle scope, and less on the firearm or something else if you have to, but get good glass you can count on, and learn how to use it well. Use a rangefinder if you want, but for long shots, you should know your bullet’s trajectory and be confident that you can place all your shots in the vital area of your quarry every time. Good glass makes it easier for success.